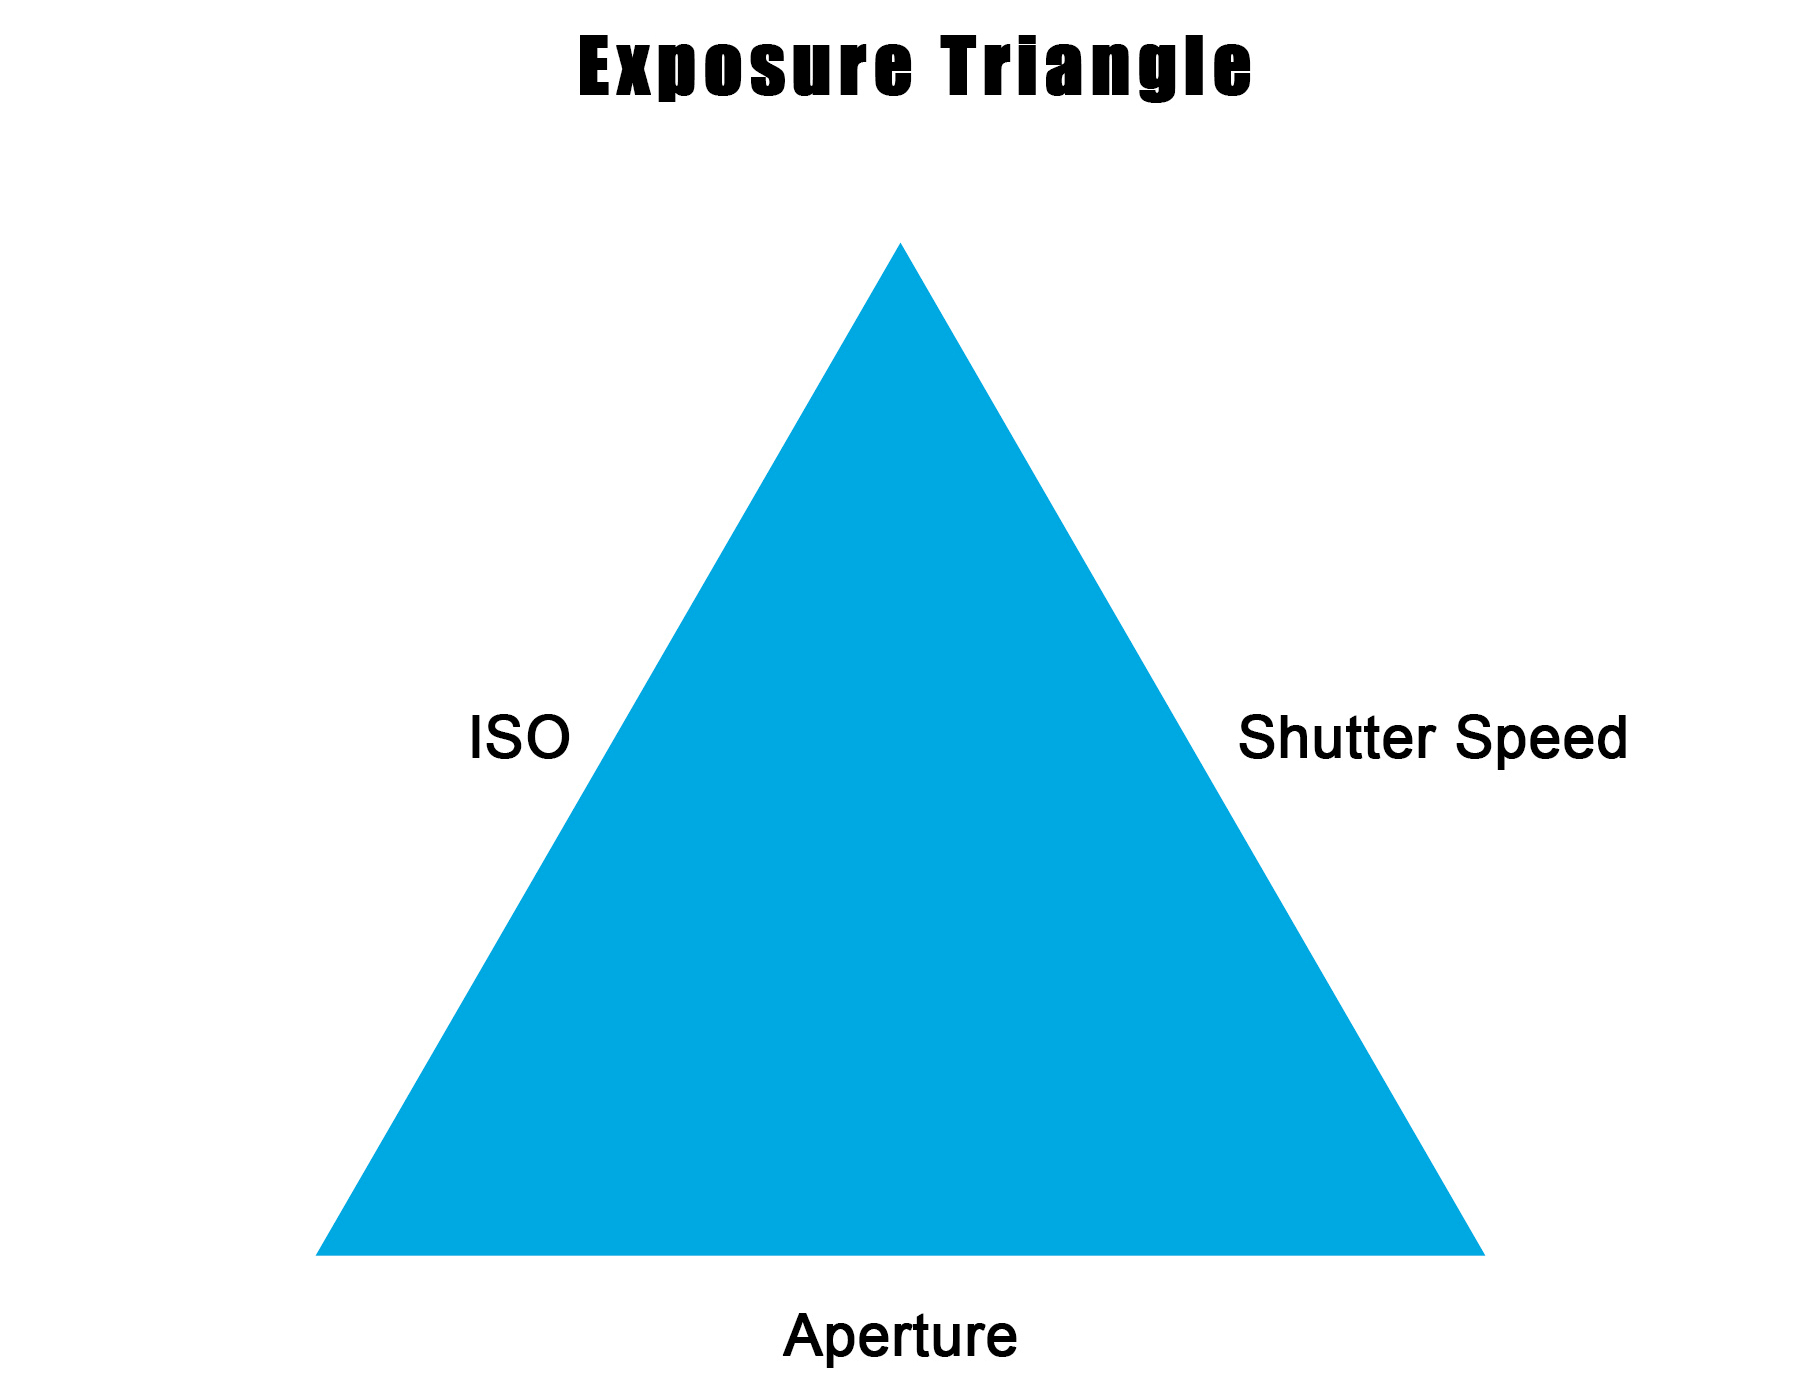
These three camera and lens parameters diagrammed above work together to govern the amount of light that creates a photographic image.
This post (kind of a “sub-post” to the February 2022 Road Trip article in which I also provided exposure metadata for each image) is written for those readers who have an interest in photography or are just curious about what goes into creating some photos. It is fairly basic and I”ll try to keep the length as reasonable as a long-winded writer can manage. So, Reader Beware – your mileage may vary.
Some of what I’ll describe in this article may feel very technical and complex. But my goal is to explain the technical terms in as plain English as I can and help you see how your modern digital camera, or smart phone for that matter, can help you get the images you want.
Some Fundamentals
First, let’s make sure we all have a similar understanding of the three parameters of exposure diagrammed at the top of this post (and provided for every image in my previous post, mentioned above). I’ll start with ISO because it always seems like the strangest-named one (you might easily guess at what the other two mean). Unhelpfully, ISO stands for International Organization for Standardization (Huh? How come its not called IOS? I think it is because those words are somewhat rearranged in another language — maybe French? — where the ISO initials come from).
ISO
More helpfully, ISO refers to a method of identifying the light sensitivity of a photographic media. Initially, it was used to identify the light-sensitivity of different types of film (and still does). More recently it refers to the sensitivity of the sensor in a digital camera. Higher numbers represents media that are more light-sensitive than lower numbers (e.g., ISO 800 is much more sensitive than ISO 100). With film cameras the most common way to change the ISO was to actually change the film in the camera. In digital cameras, it is a more useful parameter since the ISO can be changed for each image (if needed) as you are shooting.
Sensor sensitivity can be more helpfully thought of as sensor speed — how fast it can gather light. The downside to gathering light faster is the (electronic) tendency for the sensor to show digital noise, which can be seen as little white dots, and sometimes colored spots, in an image. Too much noise can be very distracting and even render an image virtually unusable.
On the other hand, some feel that a noisy image is better than no image at all. ISO can be used creatively to capture an image in a very dimly lighted setting.
There are “standard” numbers associated with ISO changes; typically you may see 100, 200, 400, 800, 1600. 3200, and more. Digital cameras, being primarily computers inside, may also have other ISO amounts between these numbers.
Shutter Speed
Shutter speed refers to the amount of time the sensor is exposed to light. In a film camera this is generally accomplished physically by moving a shutter (which is normally blocking the light coming through the lens) out of the way and then moving it (or another shutter) into position blocking the light from entering. This is the part of a camera that will normally wear out first.
Many digital cameras work exactly the same way, although In some this may be controlled by just turning the sensor on and off rather than covering it with a shutter. Shutter speed is normally expressed in terms of seconds, or fractions of seconds so 1/125 second is much faster (shorter exposure) than 1 second (longer exposure). Shutter speed can be used creatively to absolutely stop something in motion or to show motion by introducing a certain amount of blur in a moving object.
Typical “standard” shutter speeds you may see, especially on digital cameras, are 1 second, 1/2 second, 1/4, 1/8, 1/15, 1/30, 1/60, 1/125, 1/250, and more. You may also see shutter speed numbers in between these standard amounts on digital cameras.
Aperture
Aperture refers to the size of the opening through which light is allowed to enter the lens. A smaller opening allows less light than a larger one. This is similar to the way the iris in our eyes work — when the light is low, the iris in our eyes opens more (setting up a larger opening to increase the amount of light allowed to enter). But when the light is bright, the iris in our eyes closes (to a smaller opening to decrease the amount of light allowed to enter). In a camera this is usually controlled by a diaphragm within the lens. Somewhat confusingly, these openings, called f-stops, are numbered in such a way that smaller numbers (e.g., f-stop 2.8, refers to a larger opening) while larger numbers (e.g., f-stop 16, refers to a smaller opening).
The reason the numbers seem to be kind of backwards is because they refer to “…the ratio of the lens focal length to the diameter of the opening” [this is one of those weird technical terms I mentioned earlier– you don’t have to remember this at all). What counts is these numbers relate to the lens opening and are always referred to as f-stops; aperture f-stops are often abbreviated as the lower-case-letter “f” (without the quotes) followed by a stroke-symbol “/” (also, no quotes) and then the number (e.g., f/5.6 or f/16). Aperture can be used creatively to help keep a broad range of objects all in focus or to help isolate the main subject in an image by narrowing the range of focus.
There are a set of “standard” f-stops that you may see. They may possibly start with f/1.2 (a very large lens opening), f/2.8, f/4, f/5.6, f/8, f/11, f/16, f/22 (a very small opening). Which of these are available on a particular camera depends upon the lens attached to the camera. On many of my lenses, for example, the maximum opening is f/4 since a larger opening for the same focal length would require a much larger (diameter) lens. Bigger lenses are considerably heavier and certainly much more expensive. Digital cameras may also show other f-stops that are in between these standard ones. Many much less expensive cameras may have a fixed aperture – that is, they cannot change the lens opening and depend upon shutter speed and ISO only for exposure adjustment.
The Exposure Triangle and Stops
The whole point of the Exposure Triangle is to define those three parameters and show how they affect each other to retain a balanced exposure. Once those three parameters have been chosen for an exposure, any one of them can be changed as long as one of the others is also changed for a like amount in the apposite direction to create an identical, balanced exposure.
The term “stop” is also used to describe the relationship between adjacent “standard” numbers on each scale for the other two parameters because, for all three parameters, a stop is a standard amount of change that either doubles or halves the amount of light allowed. The standard ones I’ve listed in the sections above are all what are called full-stops and share that characteristic (that they represent either a halving or doubling of light between themselves and the adjacent stop).
So, allowing more light to reach the sensor by reducing the shutter speed from 1/250 second to the slower 1/125 second would require the f-stop to be reduced from f/8 to the smaller f/11 or the ISO to be lowered from 400 to 200; that is, to increase the shutter speed by one stop would require us to offset that change by one f-stop of aperture or one stop of ISO.
Ummm, so why bother?
“So, if all that is true, and the camera can make sure the exposure remains balanced, why do we need to learn all this detailed and complicated exposure stuff. In fact, I’m pretty sure that the camera on my phone (or my point-and-shoot camera), figures all this out for me and just takes the photo. They mostly look pretty good to me.”
It’s a good and reasonable question. My initial response to a comment like this might surprise you. I’d probably respond with something like, “Yep, its true. Today’s digital cameras are fairly smart and can generally figure out an exposure that works for the amount of light available and create a properly exposed image. If you are satisfied with what you get, there’s no need to make things more complicated.”
On the other hand, understanding, at least in general, how exposure works can allow you to make changes either to solve a particular lighting issue or to creatively enhance the resulting image. And the good news is that most modern digital cameras will help with all that balancing of the exposure triangle so you don’t have to remember all the details described above as long as you understand the fundamental concepts. Instead, you can focus on taking advantage of a particular exposure parameter for your own purposes (and similarly, avoid other characteristics of some exposure parameters).
Let’s take a closer look at what I mean by that. But rather than try to describe all that in the abstract (as I mostly did in defining each term, above), I’ll refer to some specific images from the February 2022 Road Trip post.
Exposure Triangle Examples
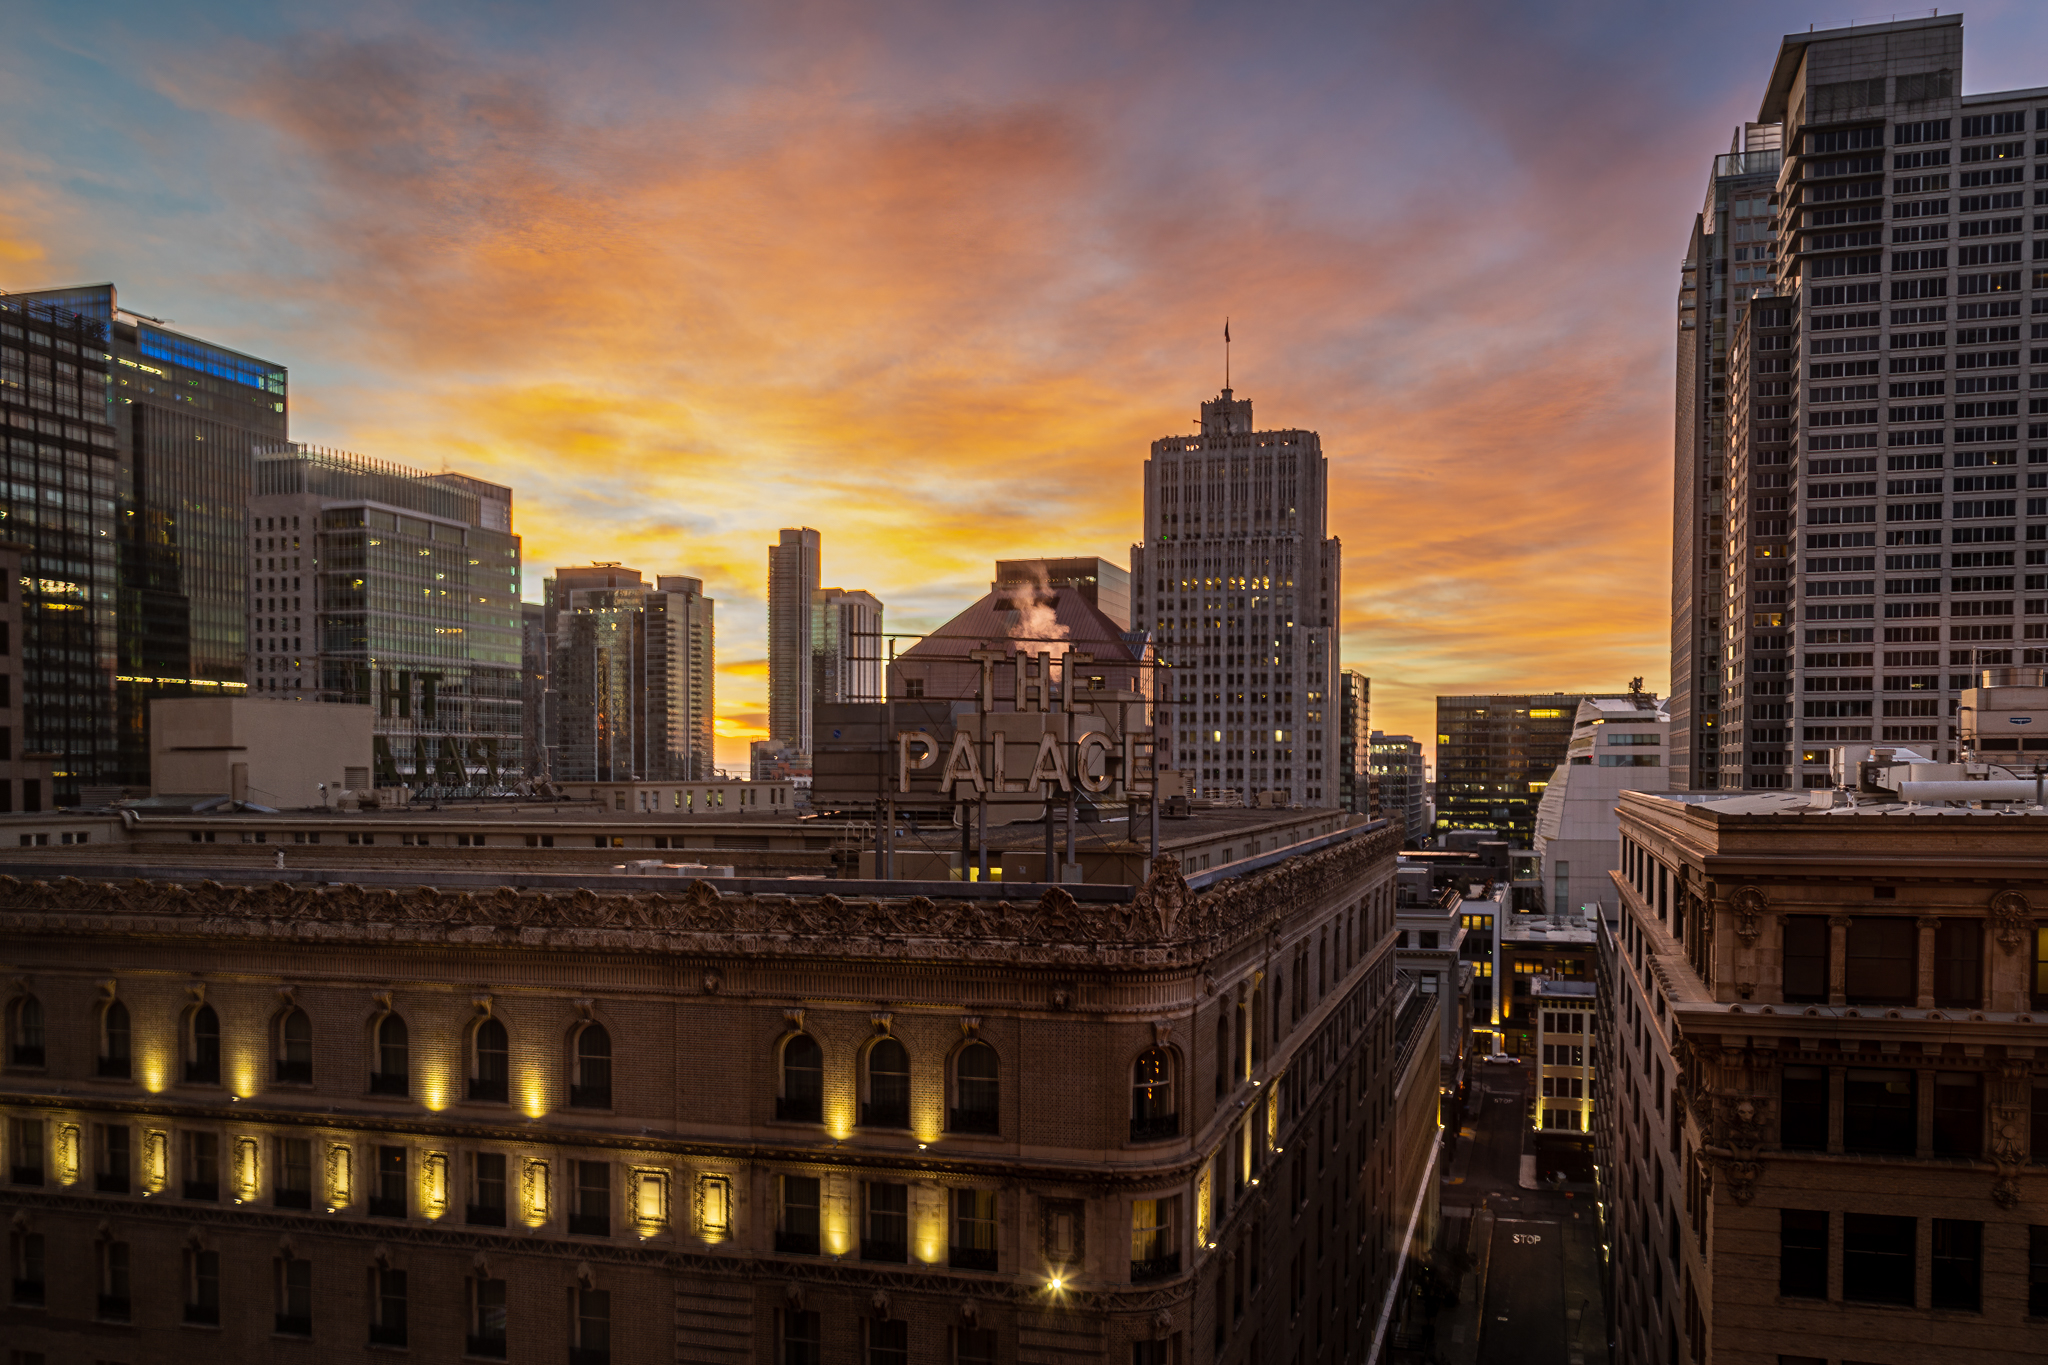
The first three photos, of downtown San Francisco, are excellent examples of lighting issues. I can use them to explain why I made certain exposure decisions. They were all relatively dark scenes so I had to find acceptable ways to increase the amount of light reaching the sensor to get the photo I wanted. In the first scene, it was very early morning with a minimum of light coming from the sky; most of the light came from electric lights in buildings and on the street. In the second image the electric lights were still contributing light but the sky was also providing quite a bit more. In the third scene, the electric lights contributed less light but the sky was providing much more.
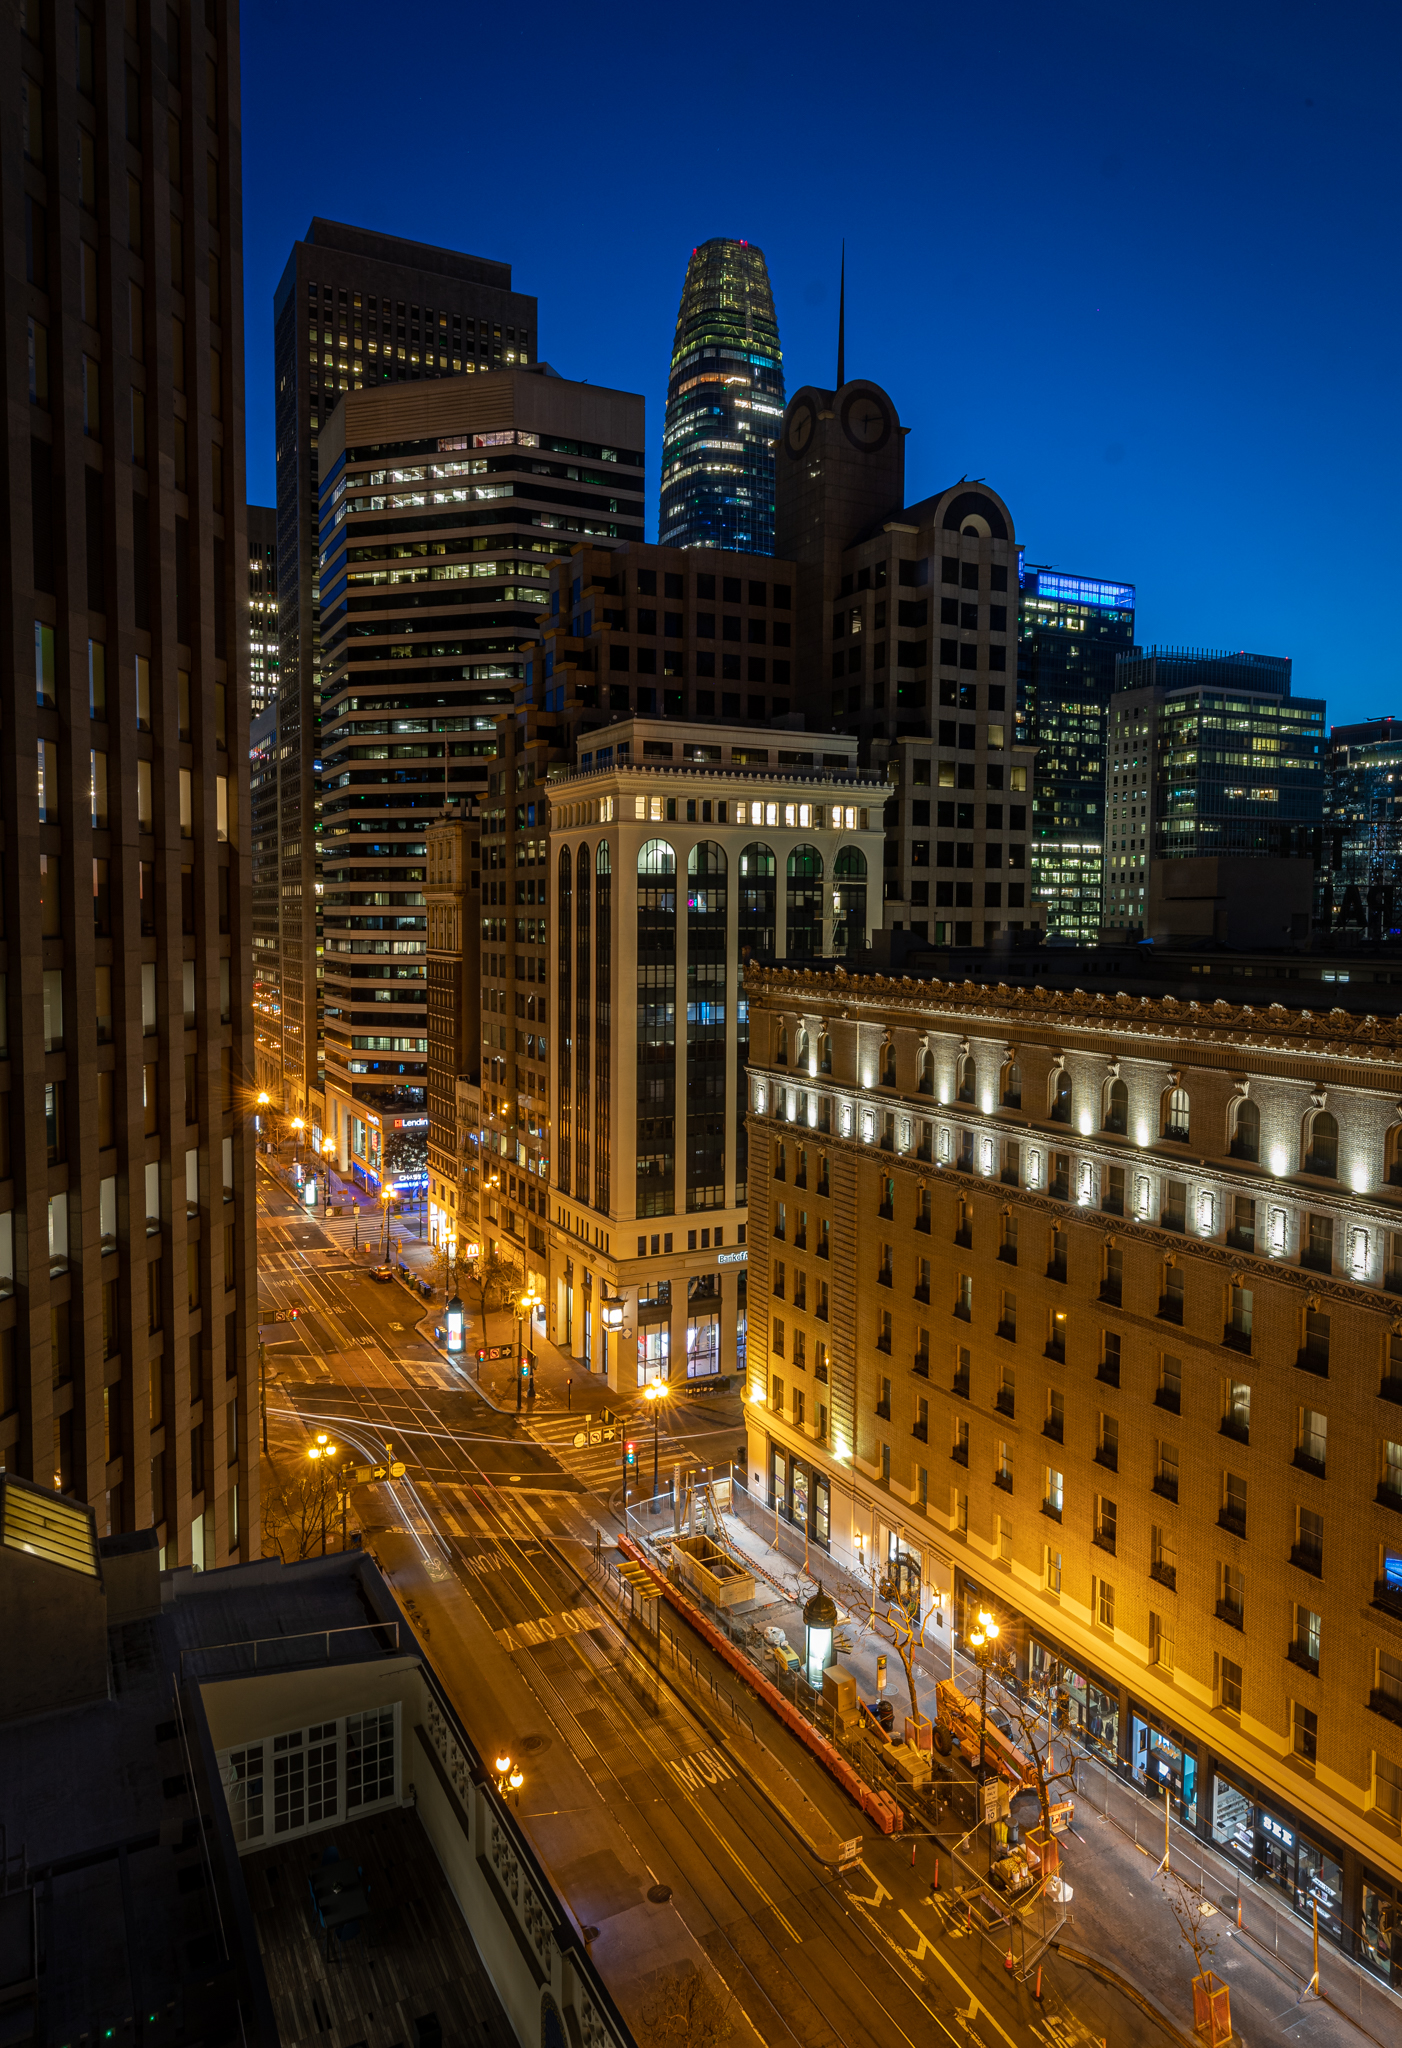

In each situation, I wanted to ensure that I got the entire scene in focus, which means I had to maximize the depth-of-field (DOF). DOF is a term that means, what will be in acceptable focus from some nearest point to a furthest point; everything outside that boundary will be out of acceptable focus (meaning somewhat blurry, to possibly very blurry). A characteristic of aperture is that a smaller opening will produce a deeper DOF and a larger opening will produce a DOF which is narrower. But a smaller aperture also allows less light to reach the sensor while I needed more light to get the photo. I selected f/16 for the aperture which I was sure would provide a sufficient DOF.
On my camera (and many others) I can set it so that when I choose the aperture I want, the camera will choose the appropriate shutter speed to get a properly balanced exposure (up to a point; it cannot automatically choose a shutter speed greater than 30 seconds). So, if the camera chooses 30 seconds, I don’t know if that is correct, or if it has just hit its limit. So, I added a stop of ISO (raising it from 100, where I usually leave it, to 200). The camera selected 25 seconds for the shutter speed, so I knew it was in balance. Of course, I had mounted the camera on a tripod to keep it absolutely still since I knew it would be a long exposure.
When I decided to take the second shot, a little later that same morning, I changed the settings a little to accommodate the change in the light. I kept the same aperture (still needed that deep DOF), but raised the ISO another stop to 400 (remember, increasing the ISO two stops from 100 to 400, means I had doubled the sensitivity of the sensor, and then doubled it again). That allowed the camera to calculate that the shutter speed should be only four seconds long.
The third image was taken on a different day from the other two. I was much more interested in highlighting the sunrise so I changed ISO back to 100. I wasn’t quite as interested in keeping the entire scene in focus because clouds will continue to look fine even if they are a little “soft” (sometimes they look better that way). I was willing for the most distant building to also become slightly blurry since I suspected it would not be very noticeable in the final image; so I also opened the aperture to f/9.0 (this is about 2/3 of the way between the standard full-stops of f/11 and f/8) so the total change was 1 2/3 f-stops from f/16 to f/9.0). The resulting shutter speed was 1/2 second.
Long or Short Exposures
On a slightly different note, I want to refer back to the first cityscape photo again, just to point out another feature of using a very long exposure. You may remember, that in the original post, I mentioned that there were some light streaks caused by vehicles moving through the scene while the image was being exposed. That happens because the lights on the vehicles are bright enough to be caught on the sensor but the vehicles themselves are too dark to be caught while moving — and so, in this case, they disappeared from the image completely, leaving only the light streaks to let us know they were there.
A fast (short) shutter speed can be used to absolutely freeze a fast moving object, when there is enough light to allow the object to be captured on the sensor. So, for example, a bird in flight, a car racing past, or falling water can be ‘frozen’ by using a very short shutter speed (like 1/1000 second or greater). In a water-fall image, captured at such a speed, each drop can be visible.
On the other hand, by using a slightly slow shutter speed (like 1, or 2 seconds) water can be caused to create a slightly smeared image that makes it look kind of creamy, while still showing plenty of water-fall detail. In more than one of my other posts (Return to Maui – after 2.5 years or Finally, a (brief) trip to blog about are examples of recent ones) there are some water images that have been taken with slightly slower shutter speeds to create that sort of effect.
The reason to bring this up is because there is an image in my recent post that takes advantage of this technique; the image I’m referring to is of the Old Fisherman’s Wharf at sunrise, shown here.
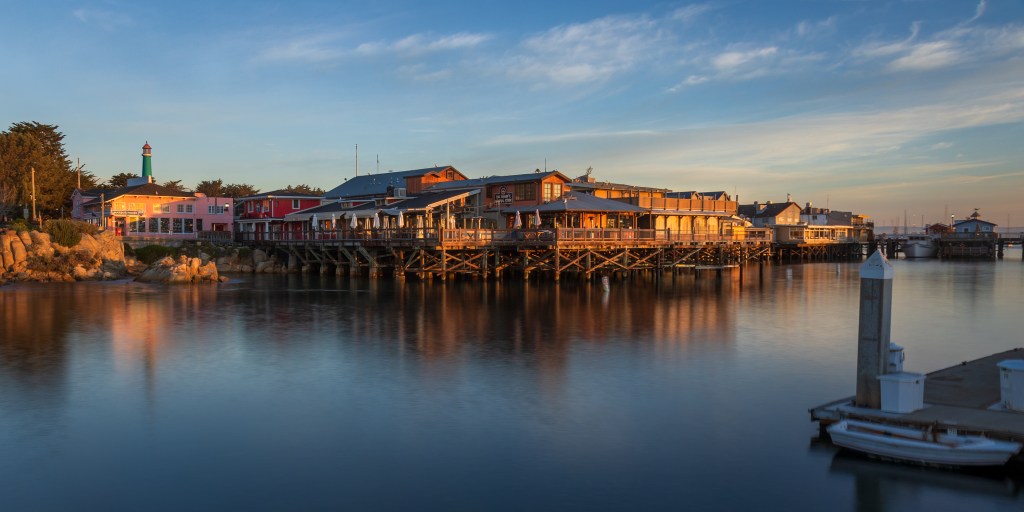
When I first shot this, I had set my camera to ISO 100 and f/16 (again, wanting a DOF to get everything in focus). The camera had enough light to get an acceptable photo at 1/4 second shutter speed. It looked great except that the water had lots of wind ripples in it (very distracting, to my eye, especially since the water is nearly half the image) but even more important, the reflection of the wharf buildings in the water was very disturbed by those ripples. I wanted the water to be just a bit smoother which I knew would provide a better reflection (but not perfectly smooth which would have looked artificial) if I could just slow the shutter speed down more.
But, I could not lower the ISO below 100; that was already the minimum available for this camera. I could reduce the aperture to f/22 but that was the smallest aperture that this lens would allow (and it might introduce some image distortion called ‘diffraction’ which very small apertures can cause). Moreover, it would only change the aperture by one stop; I needed more than that.
The solution was to place a ‘neutral density filter’ ([ND filter] essentially a gray, glass filter that is color neutral) in front of the lens. Such filters are sold in ‘stops’ (how much light they stop, determined by how dark-gray they are); I put a 6-stop ND filter in front of my lens which helped by slowing the shutter speed from 1/4 second to 4 seconds. You can see that the slower shutter speed helped to partially smooth out the water (and still left it looking realistic) while greatly improving the building’s reflections. If you look closely at the image (possibly going to the same image in my photography website or to Flickr where you can see the image in full screen) you’ll see the little ‘speed limit’ buoys near the buildings show some slight blur (‘ghost’ images) because of their motion during the five second exposure.
Well, that’s it — I think I’ve written enough (some may say, more than enough!). If you will allow, here’s a suggested lesson enhancer exercise for you to consider. Go back to the referenced post, February 2022 Road Trip and just look at any (or all) of the other photographs, all of which include exposure information, and try to explain to yourself why those particular parameters were chosen. I promise that almost none of the other images had severe or very complicated lighting issues (most were shot during the day) but just reviewing how each image was exposed may help to reinforce the concepts described in this tutorial.
I’ve not written a full-on tutorial in a long while. I’m sorry if this got more wordy than I expected but as I got into it, I realized (remembered?) how hard it is to make something that can be technical, seem less so. Also, some of you might have realized that (for purposes of “keeping this tutorial simpler”) I completely avoided talking about different lenses and their characteristics — perhaps saving that discussion for another possible tutorial post.
For those few of you who’ve read to the end, thank you. I certainly hope you got something useful from it. If you have questions or comments about any of what’s here, please feel free to write and let me know. I’ll do my best to respond to you as soon as I can.

1 Comment