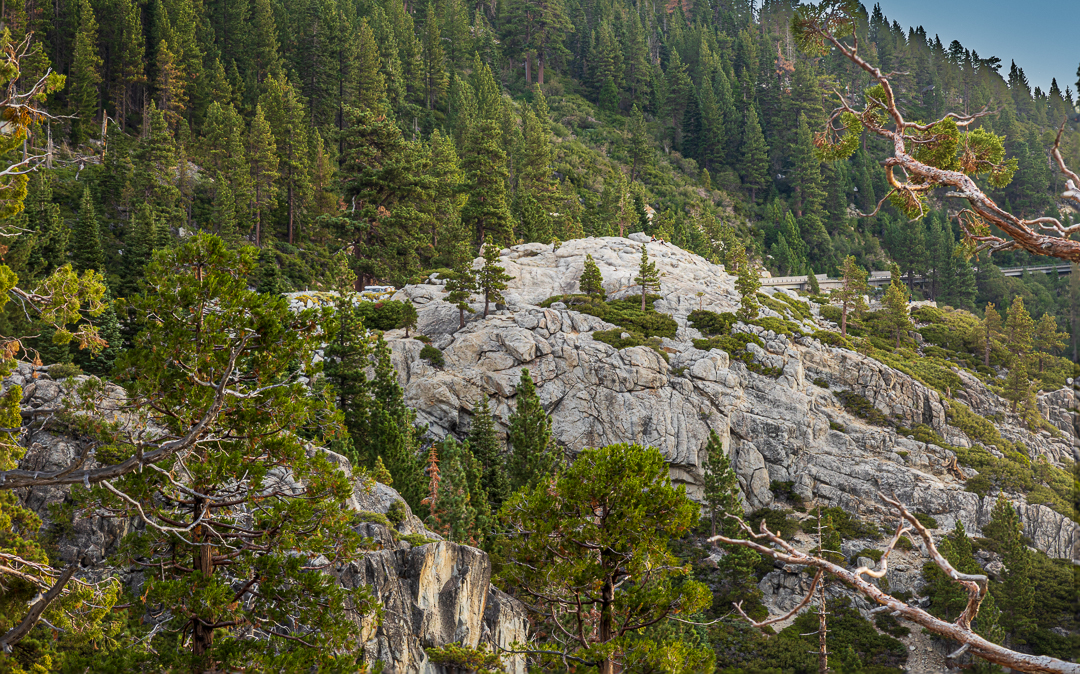
The image above was taken specifically to provide an example of a “focus-stacked” photograph. I’ll have more to say about it near the end of the tutorial.
In my recent photography tutorial blog post, Lenses, DOF, and a bit more – A Photography Tutorial, I ended the article with a brief paragraph beginning with the sentence, “Still there are situations where it might be impossible to get everything in focus.” It then went on to mention two other techniques that could be topics for another tutorial: hyperfocal distance and focus-stacking.
This is that tutorial. Focus-stacking is a technique that requires the photographer to take more than one photo of the scene and then use a post-processing approach to create a single focused image. Hyperfocal distance is a camera focusing technique that allows the photographer to maximize the DOF (Depth-of-field) in a single image.
These techniques are generally only needed when the photographer wants to keep both, very close objects and very distant objects, in focus and other approaches described in earlier tutorial posts regarding lens choice, aperture selection, and distance from closest subject are not enough to provide the desired result.
Always remember, the very simplest choice, if it is possible, is to just step back a few paces and create more distance between the camera and the closest subject. That may still mean that something else close to the camera (that was not intended to be a part of the image) will be out of focus, but those items can be removed later by cropping the photo during post processing.
Hyperfocal Distance
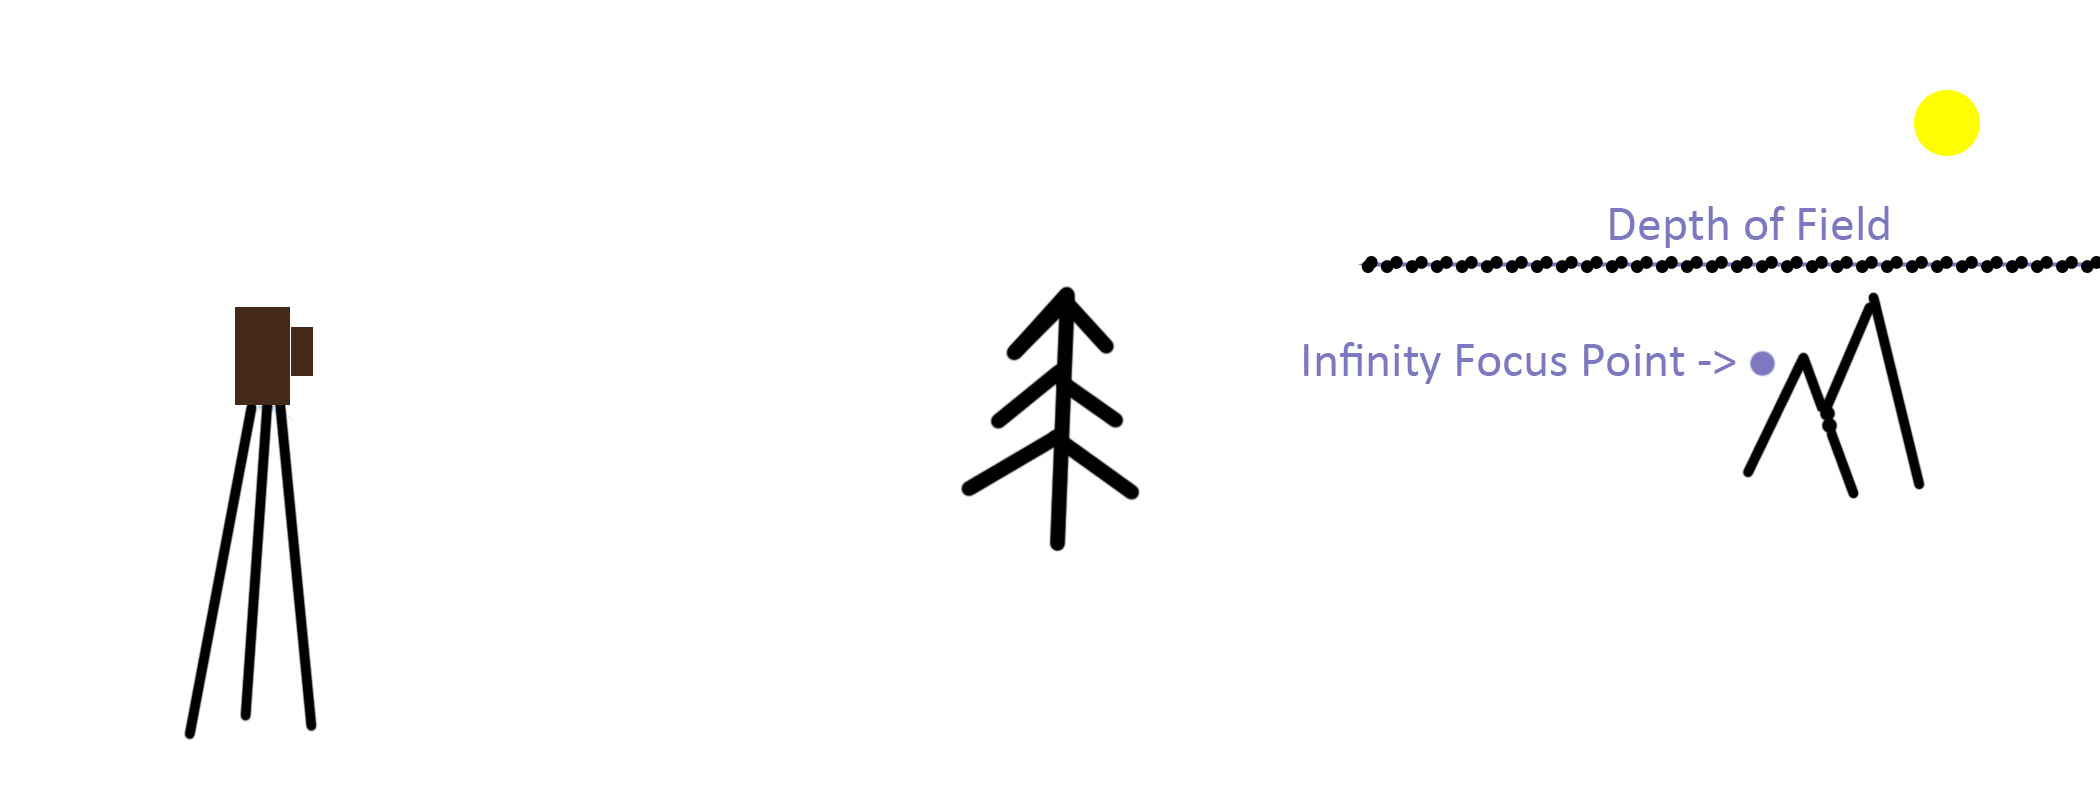
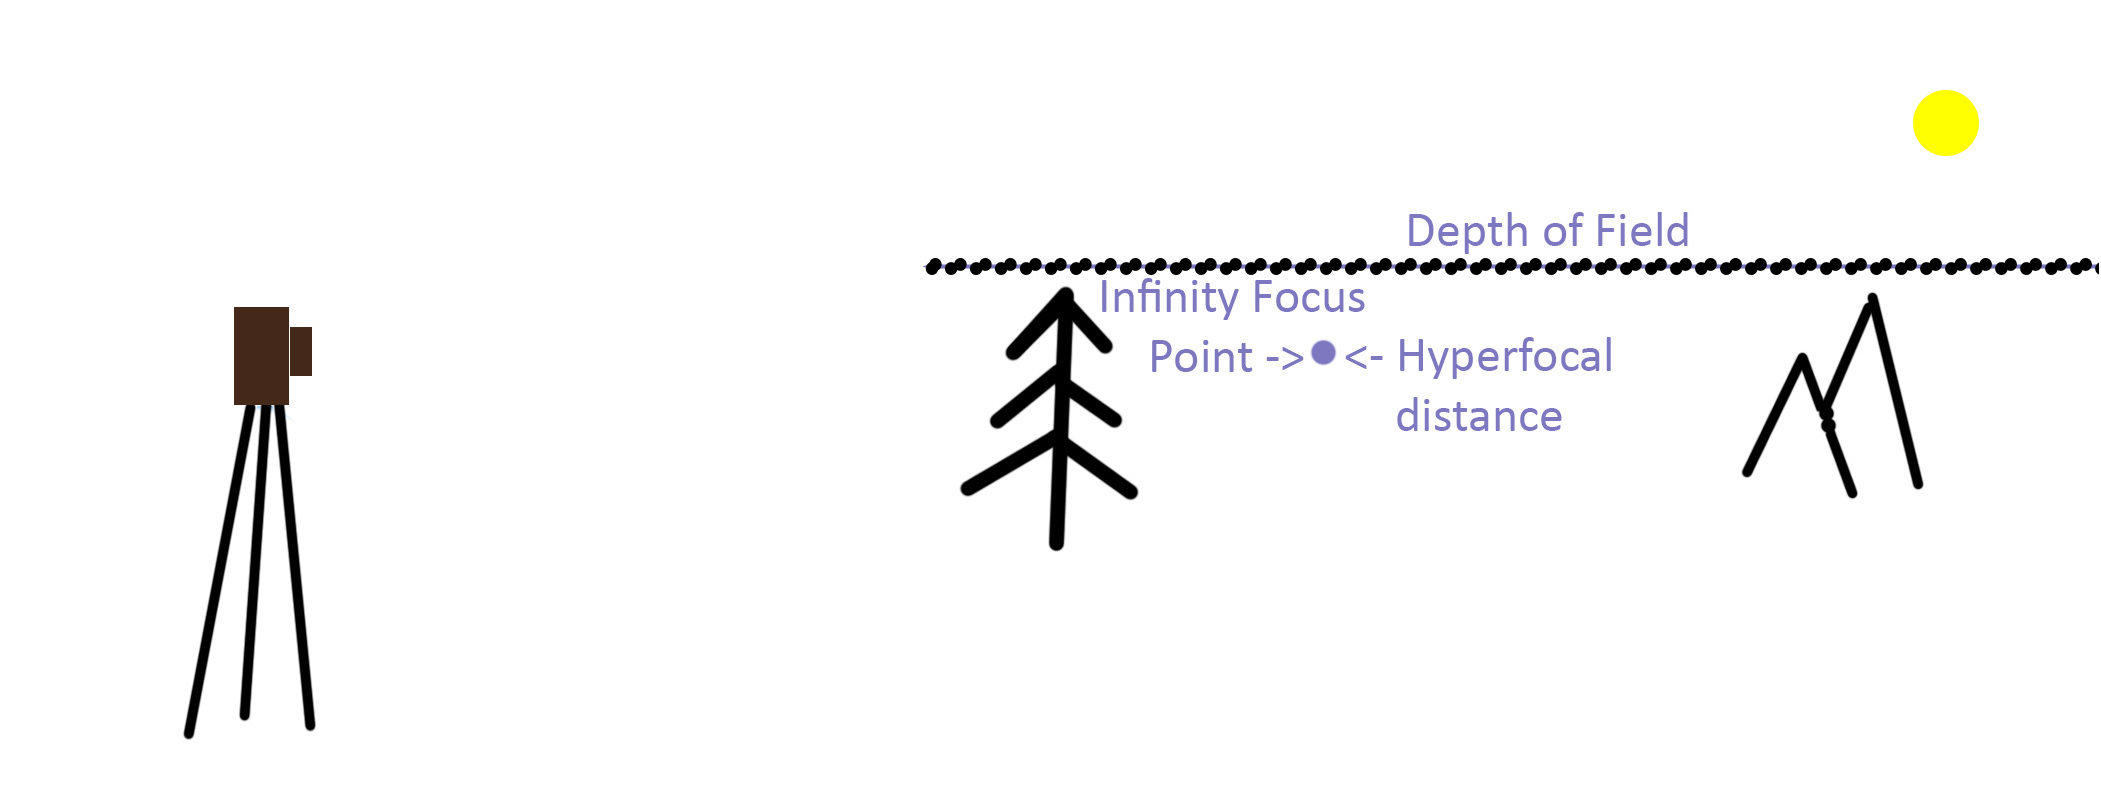
Imagine you are standing on a hill or the top of a building that gives you a broad landscape or cityscape view that you would like to photograph. You want to take in the whole of the scene and also feature an object that is fairly close to you that you would like to include in the photo to provide both interest and the viewer’s eye a place to begin entering the photograph. But, if you focus on the close object, much of the distant part of the image will be blurry and if you focus on the distant objects, the close object may be blurry. The solution seems to be to focus on something in the midground which allows both the close object(s) and the distant objects to be acceptably in focus. That midground focus point is called the hyperfocal distance.
The technical definition is the closest focusing distance that allows objects at infinity to be acceptably sharp.1 If you focus at the hyperfocal distance, your photo will be sharp from half that point toward the camera, as well as out to infinity. So, if your hyperfocal distance for a given aperture and focal length is ten feet, everything from five feet all the way until the horizon will appear sharp.1
There’s another way to understand what the hyperfocal distance is. If you focus your camera on something distant, it most likely will be found to be focusing on what the lens/aperture combination considers to be infinity. And that means that everything within the DOF in front of that distant object is also in focus. And, if something is behind that distant object, it will also be in focus because the backside of the DOF for infinity is (you guessed it) infinity.
Therefore, the idea behind the hyperfocal distance is that if you can move the infinity focus point closer to the camera, everything behind it will still be in focus while a lot more of the foreground will also be in focus. The whole idea is to successfully move the infinity focus point as close to the camera as possible without the distant focus setting becoming something less than infinity.
Here’s a pair of crude, not-to-scale, drawings which attempt to illustrate this concept.
Ok (I imagine I hear you say), “So, how do I find that hyperfocal distance?” My response to that imaginary question is, “Here are a few approaches.”
Charts and Tools
Small books and guides have been published for years that include instructions and charts of both DOF and hyperfocal distance for various aperture and different focal length lenses. Most people do not want to cart that stuff around along with cameras, lenses, tripods, and other gear.
Today, of course, that same material can be obtained as an app for a smart phone. And, in that form, they are generally easier to access and more accurate than the hard copy equivalent. The app I’ve seen many photographers use (and which I use on my phone) is called PhotoPills. It costs $10.99 and includes many other very helpful tools and additional educational information. It definitely includes DOF charts (which can be customized to your specific camera) and a hyperfocal distance calculator. A separate, fully illustrated, user guide (free) can be downloaded separately to your phone or other digital devices.
I leave it to the reader to explore that option on their own. Just below, however, are two different approaches to calculating an estimated hyperfocal distance in the field. They are both equally accurate and each have their own pros and cons regarding ease of use.
Estimating hyperfocal distance using the Double the Distance method1
In the scene you wish to photograph, estimate the distance from the camera to the closest object you want to have in focus. Then (remembering that everything from half your hyperfocal distance toward to camera will be in focus), double that estimated camera-to-closest-object distance to calculate your hyperfocal distance, stop down your aperture to increase the DOF, focus the camera on something at the calculated hyperfocal distance, and take the photo.
View the image on your camera back and increase its magnification to 100%. Verify that the image is in focus from the closest object of interest to the most distant object.
This method is simple and fast. It is a good idea to practice it a few times using scenes with different distances before using it in the field where you may be feeling other pressures to get the image. It is also a good idea to find ways to estimate distance as accurately as possible (or, for example, use one of the augmented reality tools available in PhotoPills).
The Infinity Focus method1
This technique requires that you first take a specific test shot of the scene. Start by selecting the aperture you expect to use for the image. Then focus on the background, making sure the lens is set to focus on infinity, and take the test photo. Then view the test image at 100% on the view screen of the camera. Start reviewing the image at the top (the most distant portion of the image, and slowly scroll down checking the focus as you go. When the image begins to look slightly blurry, back it up until it is sharp again and note some significant object there. That is the hyperfocal distance. Keeping the aperture at the same setting, re-focus your camera on the selected significant object and take another picture. That second image will be maximizing the DOF and should be completely in focus.
Using hyperfocal distance is a wonderful technique that will often produce a completely focused image from close to distant edges. There are only two potential shortcomings from using this approach: (1) the DOF range required for the particular scene may be insufficient to render a completely focused image or (2) the entire image is in focus, but the focus does not appear to be sharp enough to satisfy the photographer.
This latter issue comes about because the promise of hyperfocal distance is that it produces an acceptably sharp focus, not a perfectly sharp focus. That is because DOF is a range which is very sharp very close to the focus point, and gradually becomes less focused further from the focus point (until it becomes unacceptable — that is, obviously out of focus). In that case, there is one other approach which can be used the produce an image which is considered to be perfectly sharp, sometimes also called “tack sharp.”
Focus-Stacking
Focus-stacking is a method that can produce a tack sharp photo from front to back. It requires multiple images to be taken and a bit more post processing. I can only explain the process in terms of the software that I use: Adobe’s Lightroom Classic™ (LrC) and Photoshop™ (PS). If you use other tools with the same capabilities as these two Adobe products, you should be able to translate these instructions into your tool choices.
I use LrC to organize my images and keep track of them and to do most of my image post processing (all of my images are first processed within just LrC). I use PS to augment my post processing much less frequently (probably no more than 10% of the images I process) primarily to handle various special cases (like focus-stacking) and any other functions which require capabilities that are not (yet?) in LrC.
But before I get into the details, here is the fundamental outline of the process:
- The photographer takes two or more photos of the scene generally from a stationary platform, (most likely using a tripod).
- Those photos are imported into LrC and a preliminary post process is completed.
- Then the images are sent to PS and aligned as layers in a single photographic document.
- PS is then tasked to find all the best focused parts of each of the layers and assemble them into a new layer at the top of the stack.
- Sometimes, depending upon the specific scene, I’ll use a manual process to accomplish this step — but that requires a more in-depth knowledge of PS, which is well beyond the scope of this post.
- This new, focused, image is returned to LrC for any final post processing and any subsequent disposition (e.g., printing, posting to the web, storage, etc.).
Camera Activity
As mentioned above, the photographer takes at least two photos of the same scene. The camera is not moved during this process, but each image is focused on a different distance-from-the-camera portion of the scene until the photographer feels that there are enough focused photographs which, together, represent the entire scene. In many cases, only two or three photos need be taken.
Lightroom Classic Activity – part 1
Once the initial RAW images have been imported into LrC, they are given a preliminary post processing, using the Sync… (synchronization) features of LrC to ensure they are all processed in a similar way. This would normally tend to be things like correction to white balance and exposure, perhaps some color adjustment, lens correction, apply a different profile, and maybe contrast. It is best to avoid any local adjustments2.
Once that is all done, make sure all the photos in the focus-stacking set are selected by clicking on the first image, then holding the shift key, click on the last image. Then, in either the Develop module or the Library module, use the menu to select Photo > Edit In > Open as Layers in Photoshop as shown in Figure 1, below (note that your list of “Edit In” targets will very likely be different than mine, but the “Open as Layers in Photoshop” will usually be at the end of the list).

This ensures that all the photos in the focus-stacking set are brought into PS as layers within a single photographic document.
Photoshop Activity
If you are familiar with PS and using layers and masks, you can the proceed to mask out the out-of-focus parts of each layer until you achieve a completely in-focus image, which you then send back to LrC by clicking on Save (not Save as). If you are not adept with PS, there are a fairly simple set of instructions which will generally get the job done for you.
LrC and PS are designed to work well together. The very action of telling LrC to open something in PS causes PS first to be started (if it is not already running) and the image(s) to be converted to non-RAW photos suitable for PS processing, and then sent into PS. Since you may be sending two or more images (and possibly opening PS) and asking them to be loaded as layers, it all takes a bit of time. Be a little patient.
If PS is not already the application showing on screen, click its icon to bring it forward. Your screen will probably look something like Figure 2, below. Of course, the image shown will be the first of the photos you sent, now the top layer in the stack in PS.
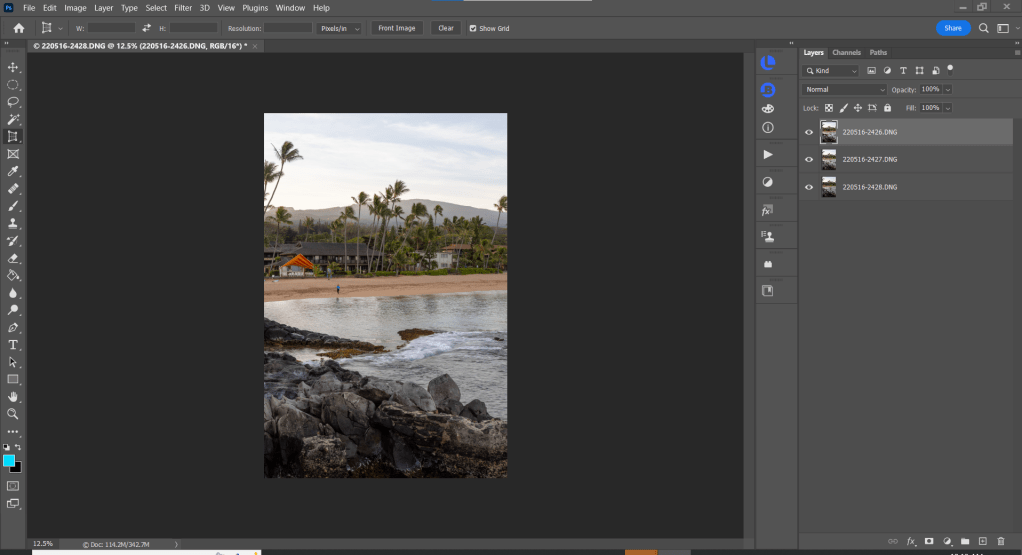
Let’s take a little tour, just to become familiar with the major areas of the PS screen. Starting at the top is the menu and just below that is a PS feature called the Options Bar; this will often change depending upon the tool being used. The column on the left side of the screen is the Tool Bar. On the far-right side of the screen is where various panels can reside and, in this sample, the Layers panel is very prominent and shows three layers, representing the three photos I sent over from LrC (each layer includes a small thumbnail of the image it represents, along with its name). You can see that the layer on top of the three is slightly highlighted, indicating it is selected. In the middle of the large black area, is the image represented by the top layer. The other two layers are also in that black area, but are just below the top one and cannot be seen at this moment since there is nothing in the top layer which is missing or transparent.
Fortunately, we are not going to have to use very much of this information to take advantage of the automatic tools we’ll be using.
Even though the original pictures were taken from a stable platform (a tripod, in this case), it is still possible that in the process of resetting focus to different parts of the scene that something moved very slightly. So, for starters, the first tool we’ll use is to make sure that all the images (layers) are perfectly aligned. Follow these first steps to accomplish perfect layer alignment:
Step 1. Select all the photo layers
- Click on the topmost layer (this one may be already selected, as it is in our example; if so, you can skip this step).
- Holding the Shift key, click on the bottom most layer.

You will know you succeeded if all the layers are highlighted (as shown in Figure 3).
Step 2. Align the layers
- From the Menu, choose Edit > Auto-Align Layers (a little over half-way down this very long menu)
- This will bring up the Auto-Align Layers dialog which normally defaults as shown with Projection set to Auto and the Lens Correction options unchecked. If it doesn’t, please set it as shown in Figure 4.
- Click the OK button and wait while the layers are aligned.

Next, we’ll ask PS to blend the aligned layers together to maximize the focus across the entire image by using the auto-blend tool and produce a new, focused image. Follow this next step to blend the layers.
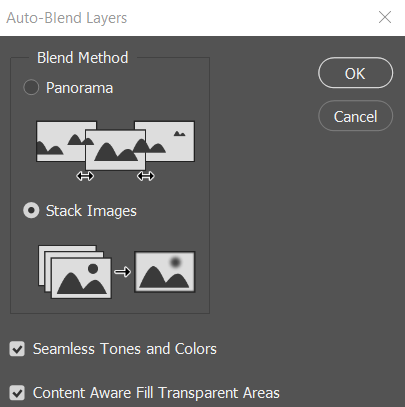
Step 3. Focus Blend the aligned layers
- From the Menu, choose Edit > Auto-Blend Layers (a little over half-way down this very long menu and just below the Auto-Align Layers menu item (just used in Step 2).
- This will bring up the Auto-Blend Layers dialog (see Figure 5, below) which normally figures out that this is a request to blend stacked layers, so the Stack Images option is checked as are the Seamless Tones and Colors and Content Aware Fill Transparent Areas options (if they are not, please check them). The Content Aware option is designed to fill in any blank (transparent) areas by using related content from within the image.
- Click the OK button and wait for it to complete the process of creating a new layer at the top of the stack, which is made up of all the best, focused sections of the underlying layers. This is another very complex process that can take a bit of time to complete.
Now, all we need to do is get the blended, focused image back into LrC for final processing.
Step 4. Send the completed image back to LrC
- Still in PS, click on the menu item File > Save.
- It is very important to use Save and not Save as. When you Save your PS work back to LrC, it knows to import the image as something new into your catalog, (leaving the original images untouched) as well as save the image in the same folder that the initial images came from.
If you try to use Save as, you will be asked where you want it saved. Assuming you get that right, it will only be in the correct operating system folder but not yet imported into LrC. At that point, you will have to import it into LrC yourself (where again, you’ll have figure out how to tell it which LrC folder to place it in). Much better to avoid this pickle by just using the Save function.
Lightroom Classic Activity – part 2
With the new blended image back in LrC, final post-processing can be completed. But there are some possible issues as the result of the process just completed that should be checked out first. If any of the images was slightly out of alignment (because of camera movement during shooting), the Auto-Align function took care of that. But one result might have been that one or more layers no longer had matching image borders with other layers. The “content aware fill” function often fixes that problem by creating something to fill in missing data at the image edge based upon nearby content and does an amazing job in most situations – but not always.
Therefore, a good move whenever the final image is back in LrC is to do an ‘edge check’ by increasing the viewable image to 100% and check out all the edges of the photo to make sure everything looks good. If you see anything that looks strange, generally the easiest fix is to just crop that side of the image a small amount to remove the problem.
Also, while you have the image zoomed up, it is also a good idea to review the entire contents to make sure the Auto-Blend function successfully created the completely focused image you wanted.
After that, you should go ahead and make any other adjustments, both global and local2, that you feel improves the photo. Certainly, this is the time to do any additional sharpening and/or noise reduction, add clarity and or texture as needed, color adjustment, dodging and burning, creative cropping, or any other changes.
That pretty much ends this tutorial. If the topic was of interest, I hope it helped to clarify some concepts and to provide you with a few additional photographic tools.
I’ve included an image at the top of this post, not because I think it is a memorable photo (it isn’t, in my opinion). I took it because I wanted to have an image to illustrate a result of focus-stacking.
Those branches sticking in from the right edge into the close foreground, were very close to the camera, so close that I focused more than once on various parts of them, then focused into the close edge of the midground, and finally the background. All in all, I made five different exposures, always with the same settings (84mm, 1.3s, f/16, ISO 200) but just focusing to different distances. Then, I ran it through the process I described above. In terms of focus, I think it worked quite well.
Interesting enough, to me, I didn’t notice while I was shooting (at about 6:20 AM) but when I was processing these into a single, focused photo, I noticed that some young women had climbed onto the top of that huge chunk of granite in the middle of the picture and were just sitting there, enjoying the view. At this level of magnification, you can just barely see two of them sitting up there.
Final Comment
This has been a tutorial about trying to get everything in focus. But it is important to also mention that not every photo needs to be in focus from front to back. In fact, some images are best if the primary subject is in focus and the rest of the photograph is deliberately left out of focus. There are no real rules in photography, just guidelines, suggestions, and composition approaches (some of these are called rules but they are not – they are merely suggestions).
Footnotes
1 I’ve understood the idea of hyperfocal distance for many years – so long in fact, that although I seem to use it without much thought, I’ve forgotten how to describe it. So, in trying to convey information about hyperfocal distance as well as I could manage, I borrowed quite a bit from an article published by Spencer Cox in the 2019 online version of Photography Life, called Hyperfocal Distance Explained. I lifted a couple of sentences directly, feeling that there was no point in trying to rewrite what was already well written. I also took the two methods to compute hyperfocal distance he provided in that article and re-wrote them (primarily to provide the guidance but to reduce their length).
In all those situations, I’ve added this same footnote number to properly provide a citation. I’ve also linked the title of the article in this post (above paragraph) to his posted article. Everything else in this blog post is my own work, based upon what I know from practice or have learned over the years from countless other books, articles, classes, discussions, and tutorials.
2 I’ve been using Lightroom since it was first released as a beta so my LrC vocabulary is still stuck with the term “local adjustment” even though I know that with recent major improvements to that functionality, it is now termed “masking.”

2 Comments